Service alerts
Providing a comprehensive and accurate service alerts feed is a key part of delivering accurate information about transit service to riders. Knowing about stop closures, detoured routes, cancelled service, and significant delays in advance can save riders time and frustration.
The GTFS real-time format includes a standardised format for service alerts. Using this format allows trip planners, including Transit, to provide alternatives and inform riders of relevant incidents.
In order to display relevant alerts to riders, we need to know the most important details of the alert. This includes the impacted transit services, the nature of the disruption, the reason for the disruption, and when the service alert applies. This article will cover each part in turn.
In this article:
- Entity selectors
- Effect
- Header and description
- Time ranges
- How alerts are displayed / Alert behavior
- Transit Webinar: When and how to use service alerts
Entity selectors
Click here to read the GTFS.org documentation for Entity selectors.
Entity selectors specify what is impacted by the disruption. Multiple selectors can be used for one service alert, and each selector can specify entities such as the route, stop, trip, and/or agency affected. Each individual selector applies the combination (intersection) of the entities specified. All identifiers, like route_id , trip_id or stop_id must reference the currently active GTFS Schedule data. In the specification, these are informed_entities .
Transit supports agency, route, route_type, stop, and trip selectors:
Agency_idselectors will appear on each route that belongs to that agencyRoute_typeselectors will apply to each route with that type.- Route selectors will apply to the entire route: every trip, and stop served by that route.
Stop_idselectors will apply that alert to the relevant GTFS stop – this includes stations, platforms and entrances. You may, for example, publish an accessibility alert on an entrance that is temporarily inaccessible to wheelchair users.- Alerts with entities with a
trip_idwill appear next to the impacted trip(s). - If an alert affects all stops on a route, do not specify entity selectors for every stop. Instead, specify only the
route_idas the entity. Similarly, do not specify everytrip_idif the alert affects all trips in the time range. - Choose the most specific stop entity possible; we support entrances, stations, platforms
- For station closures, only specify the
stop_id’s that are completely closed for passenger service. For example if Station B is closed but riders can get on and off at Station A and C, heading away from station B, only include Station B in the entity.
Here are some scenarios that illustrate how informed entities can combine to express different disruptions:
|
Scenario
|
Entity to include in the selector
|
Where alert will be visible
|
|---|---|---|
|
Train route won’t serve Central Station
|
Route A’s route_id and Central Stations stop_id
|
On all Route A trips travelling towards Central Station
|
|
Central Station is closed
|
Only Central Station’s stop_id
|
On all routes that serve Central Station
|
|
Route B is significantly delayed along the whole route
|
Only Route B’s route_id
|
On Route B, in both directions
|
Effect
Click here to read the GTFS.org documentation on Effect.
The Effect field specifies how service is disrupted. Using the most appropriate effect in an alert allows riders and trip planners to correctly understand the severity of, and how to adapt to, the service disruption. There are twelve possible values to choose from. Transit associates each Effect to a predetermined severity level that specifies its impact on trip plans. The chosen effect may be used to generate copy visible in the app (below departures, for example).
Severity levels
Transit categorizes alerts into one of three levels: Severe, Warning, or Info. Each severity level displays differently and has different impacts on functionality in the app.
Note: Transit doesn’t consume experimental severity levels. We will only infer severity from effect/entity combinations.

Transit’s automatic effect detection
Header and description
The alert text should provide more context and concisely explain how to plan around the service disruption. For example, if a stop moved, it’s important to tell the rider where it went. If a line is detoured, include a description of the temporary deviated route. The text can also add more details on the cause of the disruption
- Use line breaks to make your service alert easier to read.
- While there is no character limit for service alerts, users will be viewing alerts on mobile devices. Please be as concise as possible without sacrificing clarity. As a rule of thumb: the header text should fit in a push notification, and descriptions should fit on a screen (150-200 words).
- If the affected entity is a
trip_id, include the departure time and headsign in the alert description copy. - Service alerts should contain information about transit service specific to the affected line, stop, or trip only. Please don’t use them to advertise unrelated events or promote other apps.
If the header text is not provided, Transit may use the CAUSE field to generate a header. The cause field does not impact trip plans.
Translations
The header and description text may be localized using the Translation message to the languages that Transit supports. Users will see the copy in their device language when it is available. If not, they will see the alert in the agency’s default language.
Make sure languages are labelled correctly, so users receive alerts in their app’s language as often as possible.
Time ranges
The active_period field specifies when the service alert applies and tells riders when to expect changes to their transit service. Active alerts are displayed most prominently in the app. When an alert takes effect in the future, it is displayed at the info level. When riders plan trips during the affected time, they will be taken into account and displayed at the level indicated above. Transit will display alerts up to two weeks before their next active period.
- If no time ranges are specified in the data, Transit considers the alert to be active for as long as it is in the feed.
- If an alert has repeating time ranges across multiple periods, it should specify a time range for each period covered. For example, an alert with a week-long nightly closure would include seven time ranges.
- When possible, include future alerts, so riders can prepare for service changes.
- Push notifications [link to push notification section] will be sent when the disruption first starts, not when the alert is published.
- Only publish information you know to be certain – it’s better to not provide an end date than to include an incorrect one.
Unsupported fields
Transit does not currently support the following fields:
- Clickable links in the copy
- Formatting (bold, italics, etc.)
- URL field
How alerts are displayed / Alert behavior
How service alerts in Transit are displayed is primarily a function of the alert severity. The higher the severity level, the more visible the alert is in the app.
Here’s a comprehensive breakdown. You can also click on the following sections to skip to what’s relevant:
Severe alerts
Transit will replace the upcoming departure with a hazard symbol (⚠️) if a “No service” alert is applied to a route. If a rider taps on the route, the alert will appear prominently in red and all departures will be crossed out. Tapping on the alert badge will display additional information about the alert, including the header and description text.
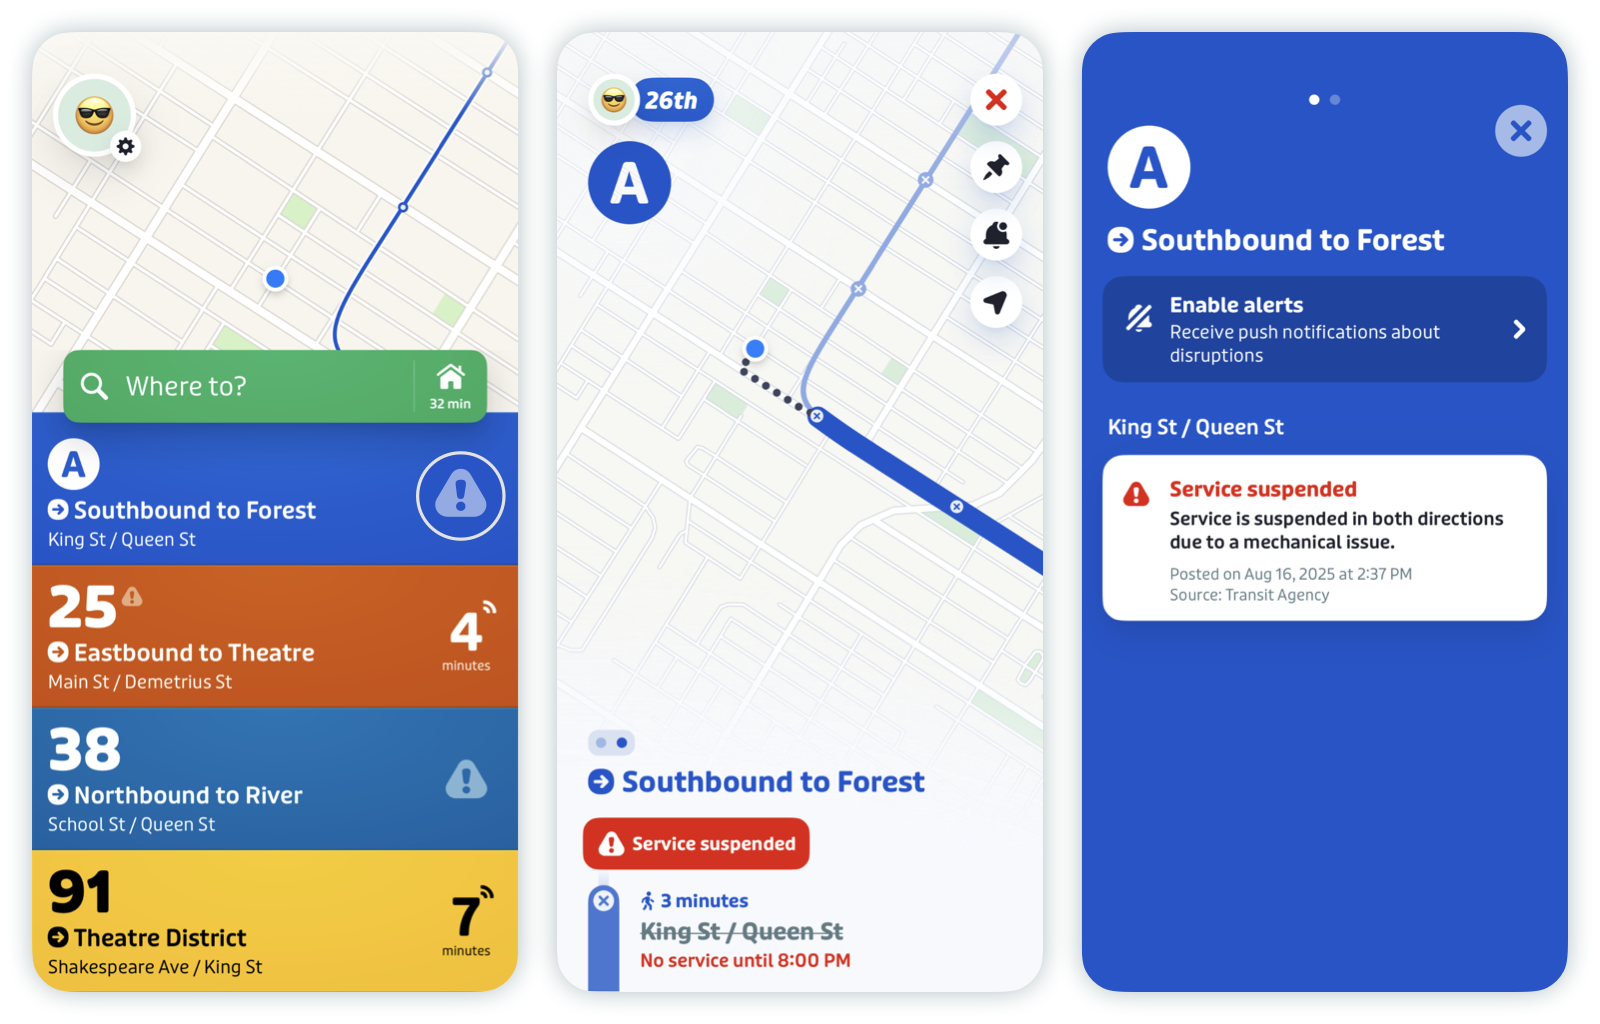
The trip planner will not propose riders embark or disembark at stops with severe alerts (no service).
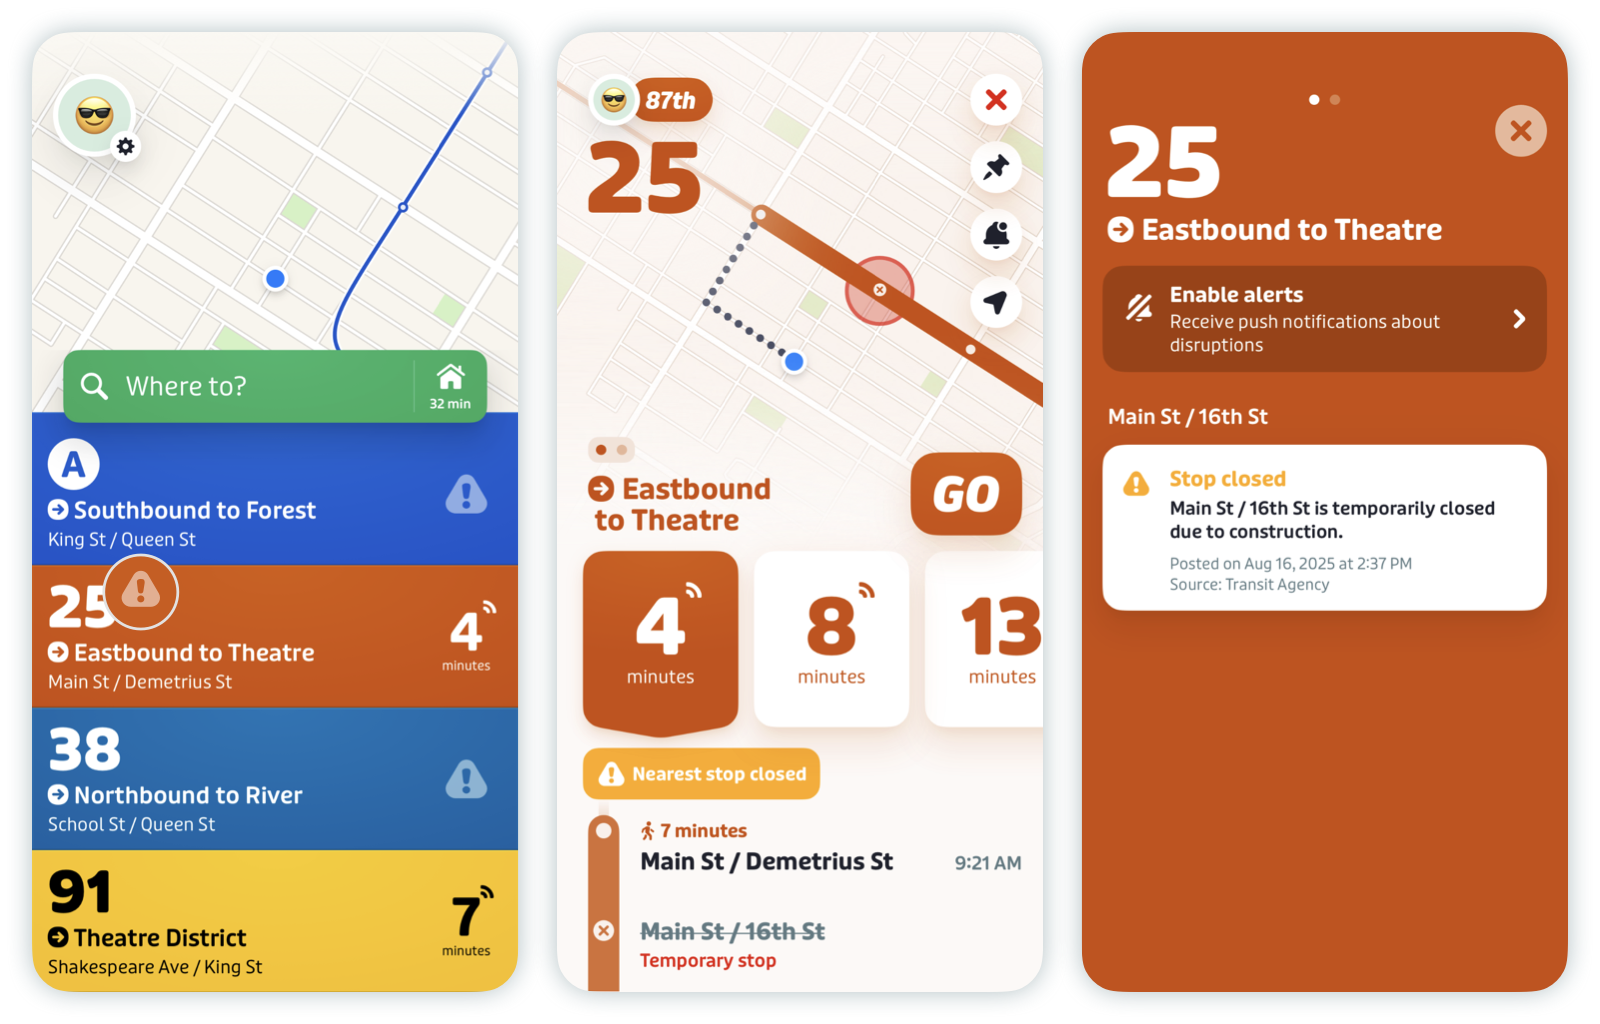
Transit displays severe alerts on stops slightly differently depending on how close a rider is to the next closest open stop. If a rider is within 500m of an open stop on that route, Transit will automatically reroute them there, and display “Nearest stop closed” at a warning level. A small ⚠️ symbol will appear next to the route name or number in main screen.
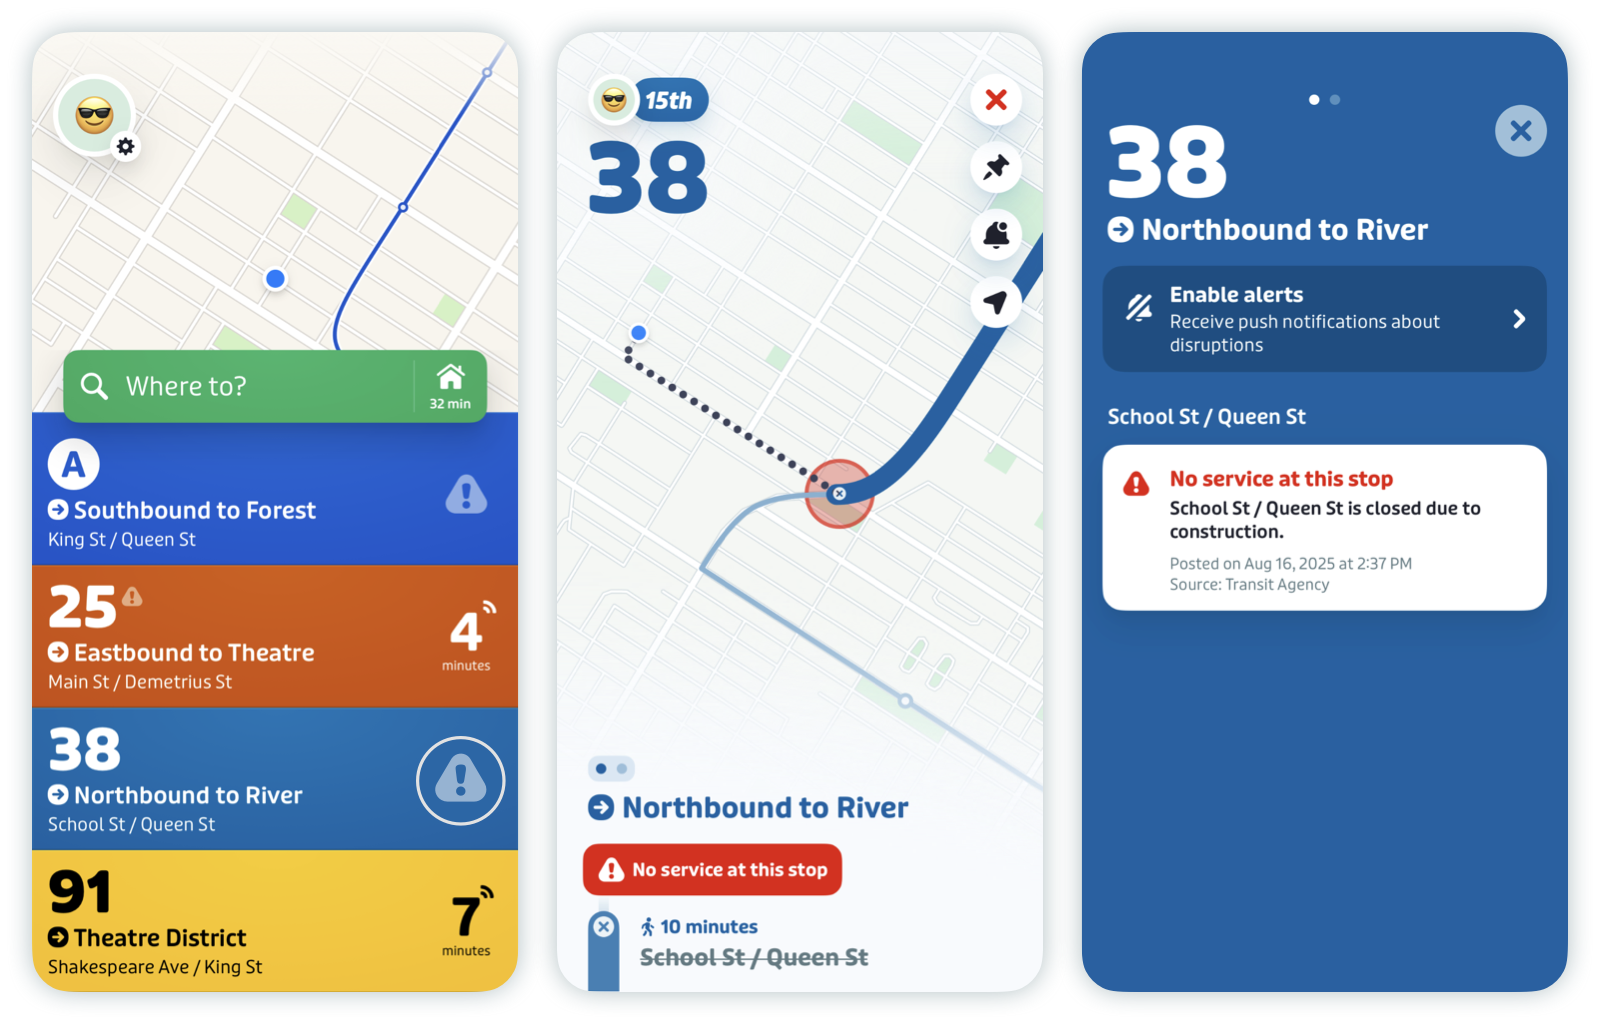
If a rider is more than 500m from the next open stop, Transit will display “No service at this top” in red if the user taps on the route. A small ⚠️ symbol will display next to the route name or number on the Main Screen screen.
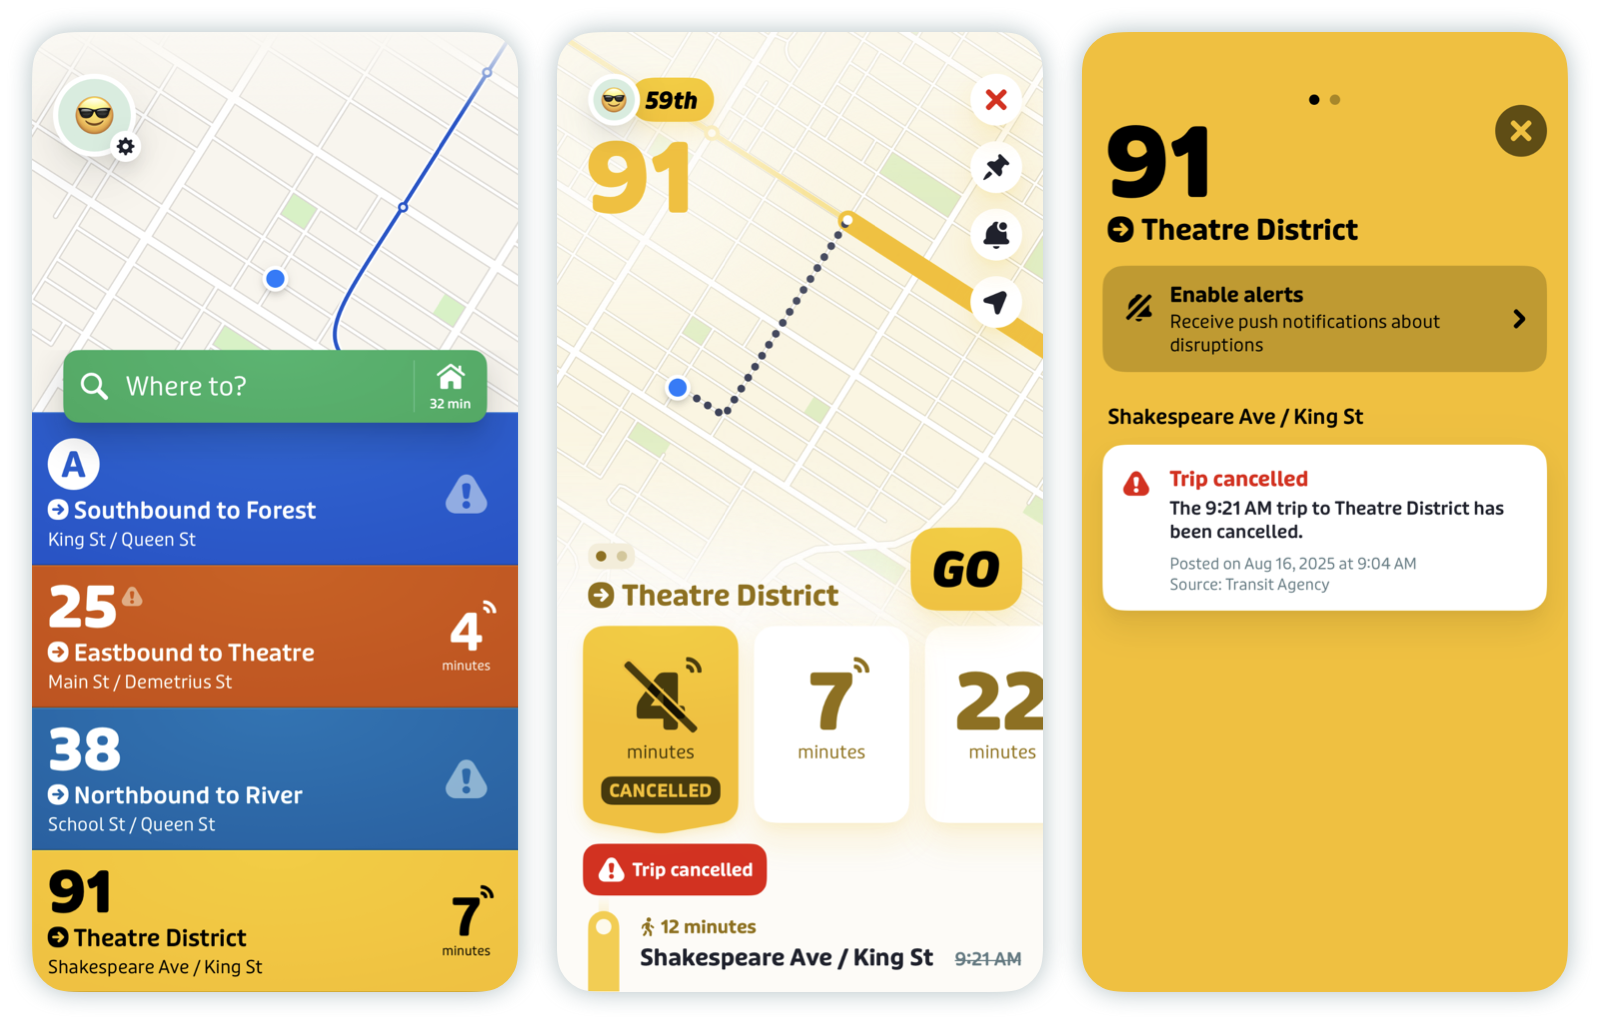
For a severe alert on a trip, Transit will display a “Cancelled” label next to a struck-through departure time. The red “Trip cancelled” card will only display if the cancelled departure is selected. On the Main Screen, the cancelled departure will be skipped and Transit will display the upcoming unaffected departure.

Warning alerts
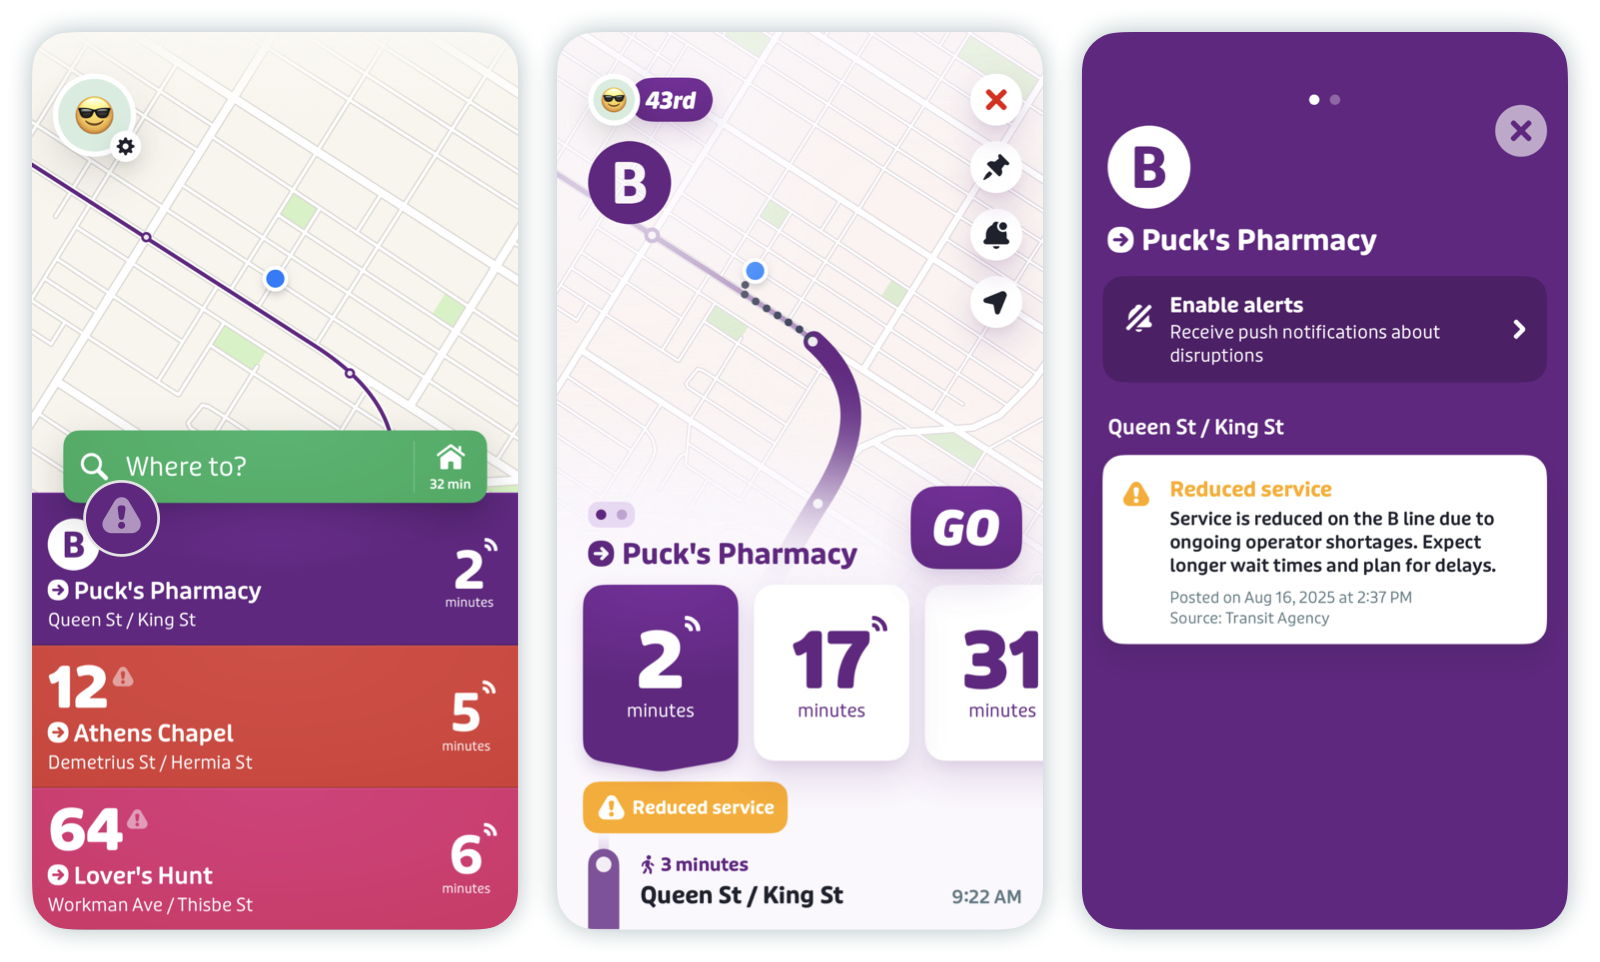
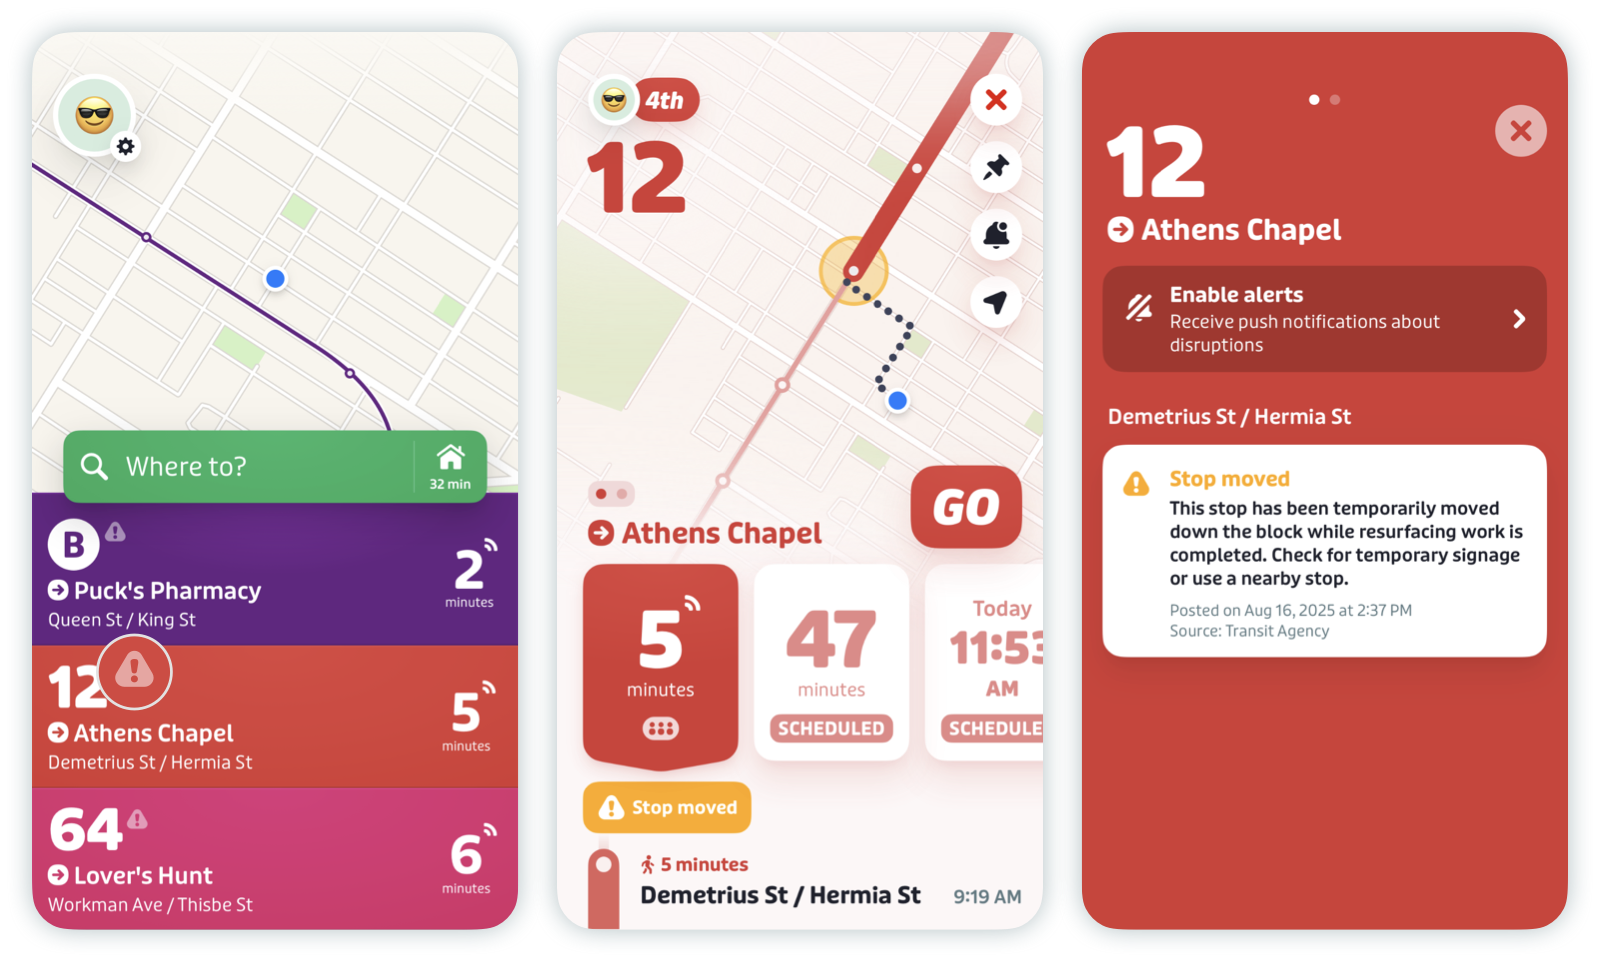
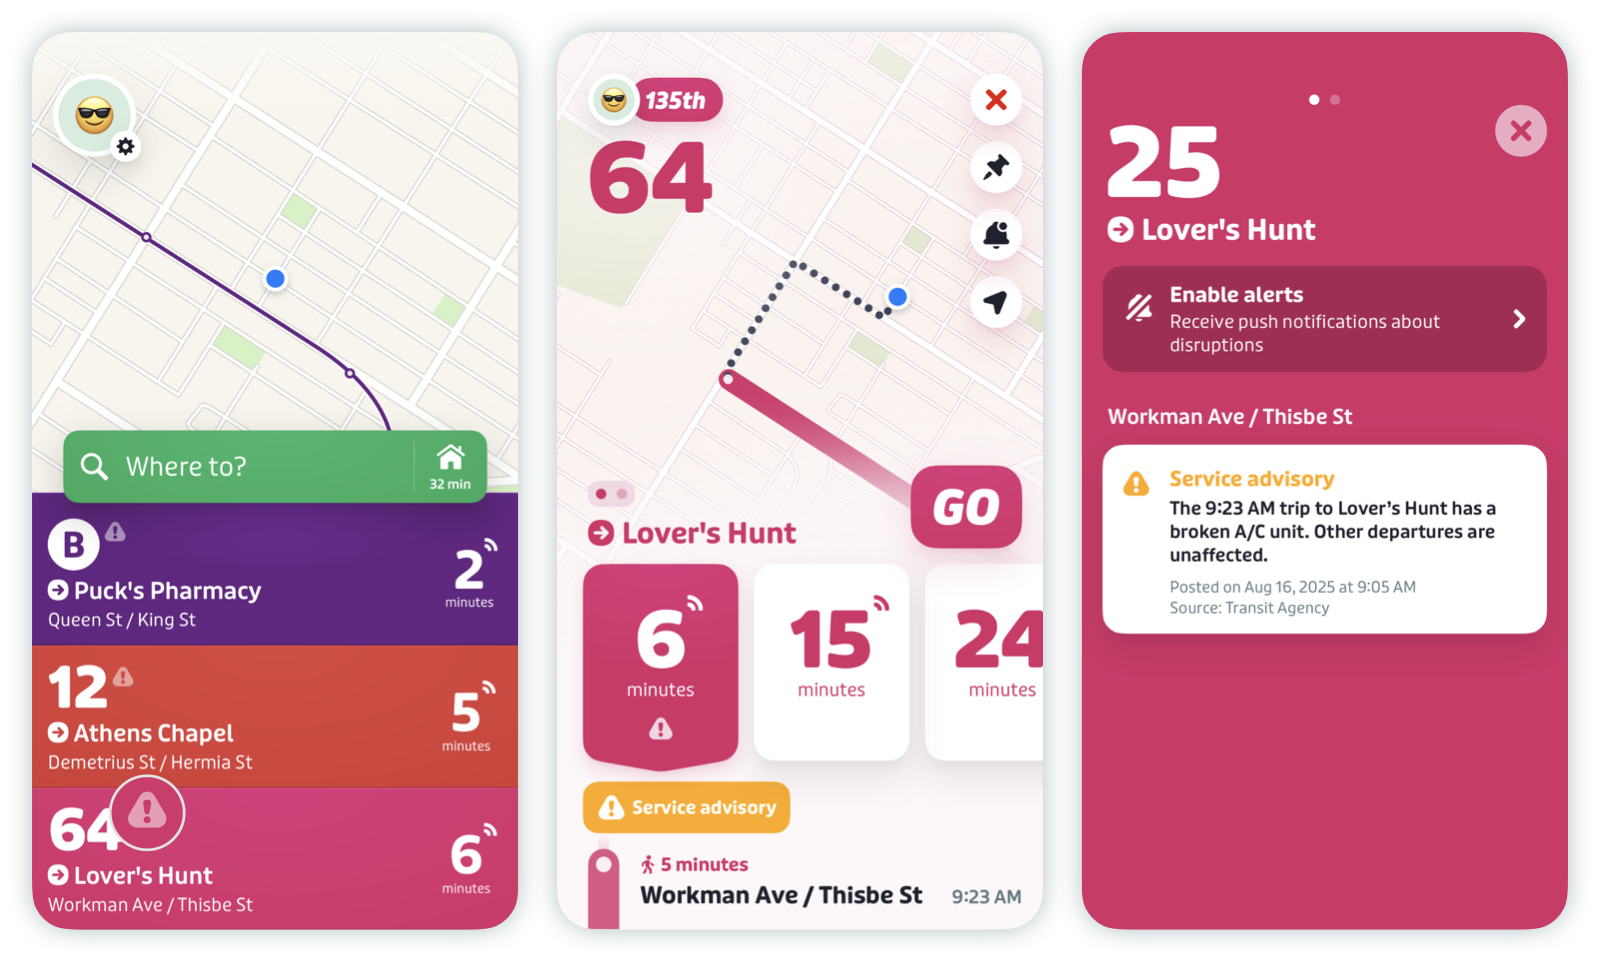
Warning level alerts display next to the route name or number on Main Screen, and feature prominently in yellow when consulting upcoming departures in Route Details.
Warning alerts at the route level show a small ⚠️ icon next to the route name and a yellow card under upcoming departures.
Warning alerts for a specific stop will also appear on the Main Screen as a small ⚠️ icon next to the route name, but only when that is the closest stop on that route. When consulting Route Details, the affected stop will be shown with a yellow circle, and a yellow card will appear under upcoming departures.
Warning alerts at the trip level also appear as a small ⚠️ icon next to the route name in Main Screen. In Route Details, a small ⚠️ icon is also present at the bottom of the ETA card for the affected trip, in addition to a yellow card underneath the departures.
Info alerts
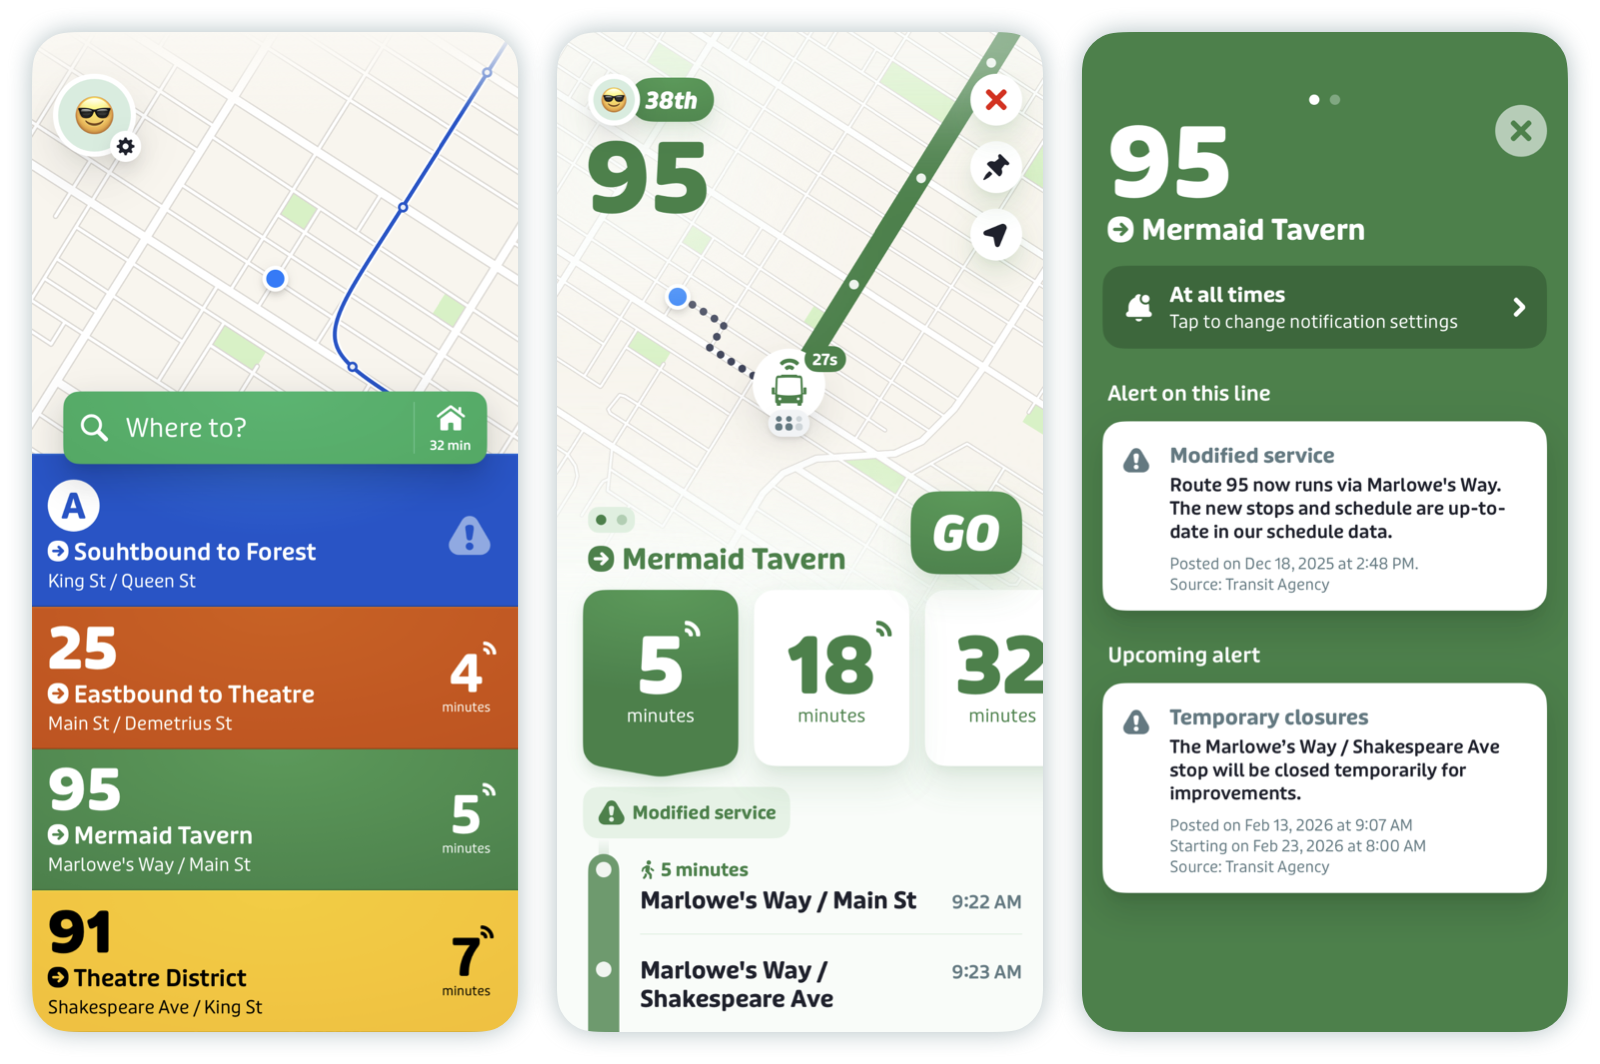
Info level alerts are visible only in Route Details when a rider consults upcoming departures. They are not visible on the Main Screen.
Note that they might appear after other information about the route, like fares or on time performance cards.
Upcoming alerts will appear as Info level alerts until they start, regardless of their severity level.
Trip plans
Severe alerts
Routes and stops affected by severe alerts are excluded from consideration by the trip planner, so they won’t appear in trip plans.
Note: Transit allows through travel on closed stops/segments.
For example, take the following stop sequence:
- a
- b closed
- c closed
- d
Transit won’t display trips that embark/disembark at B or C, but we’ll propose travel from A to D. This is usually correct, but not always.
Warning alerts and info alerts
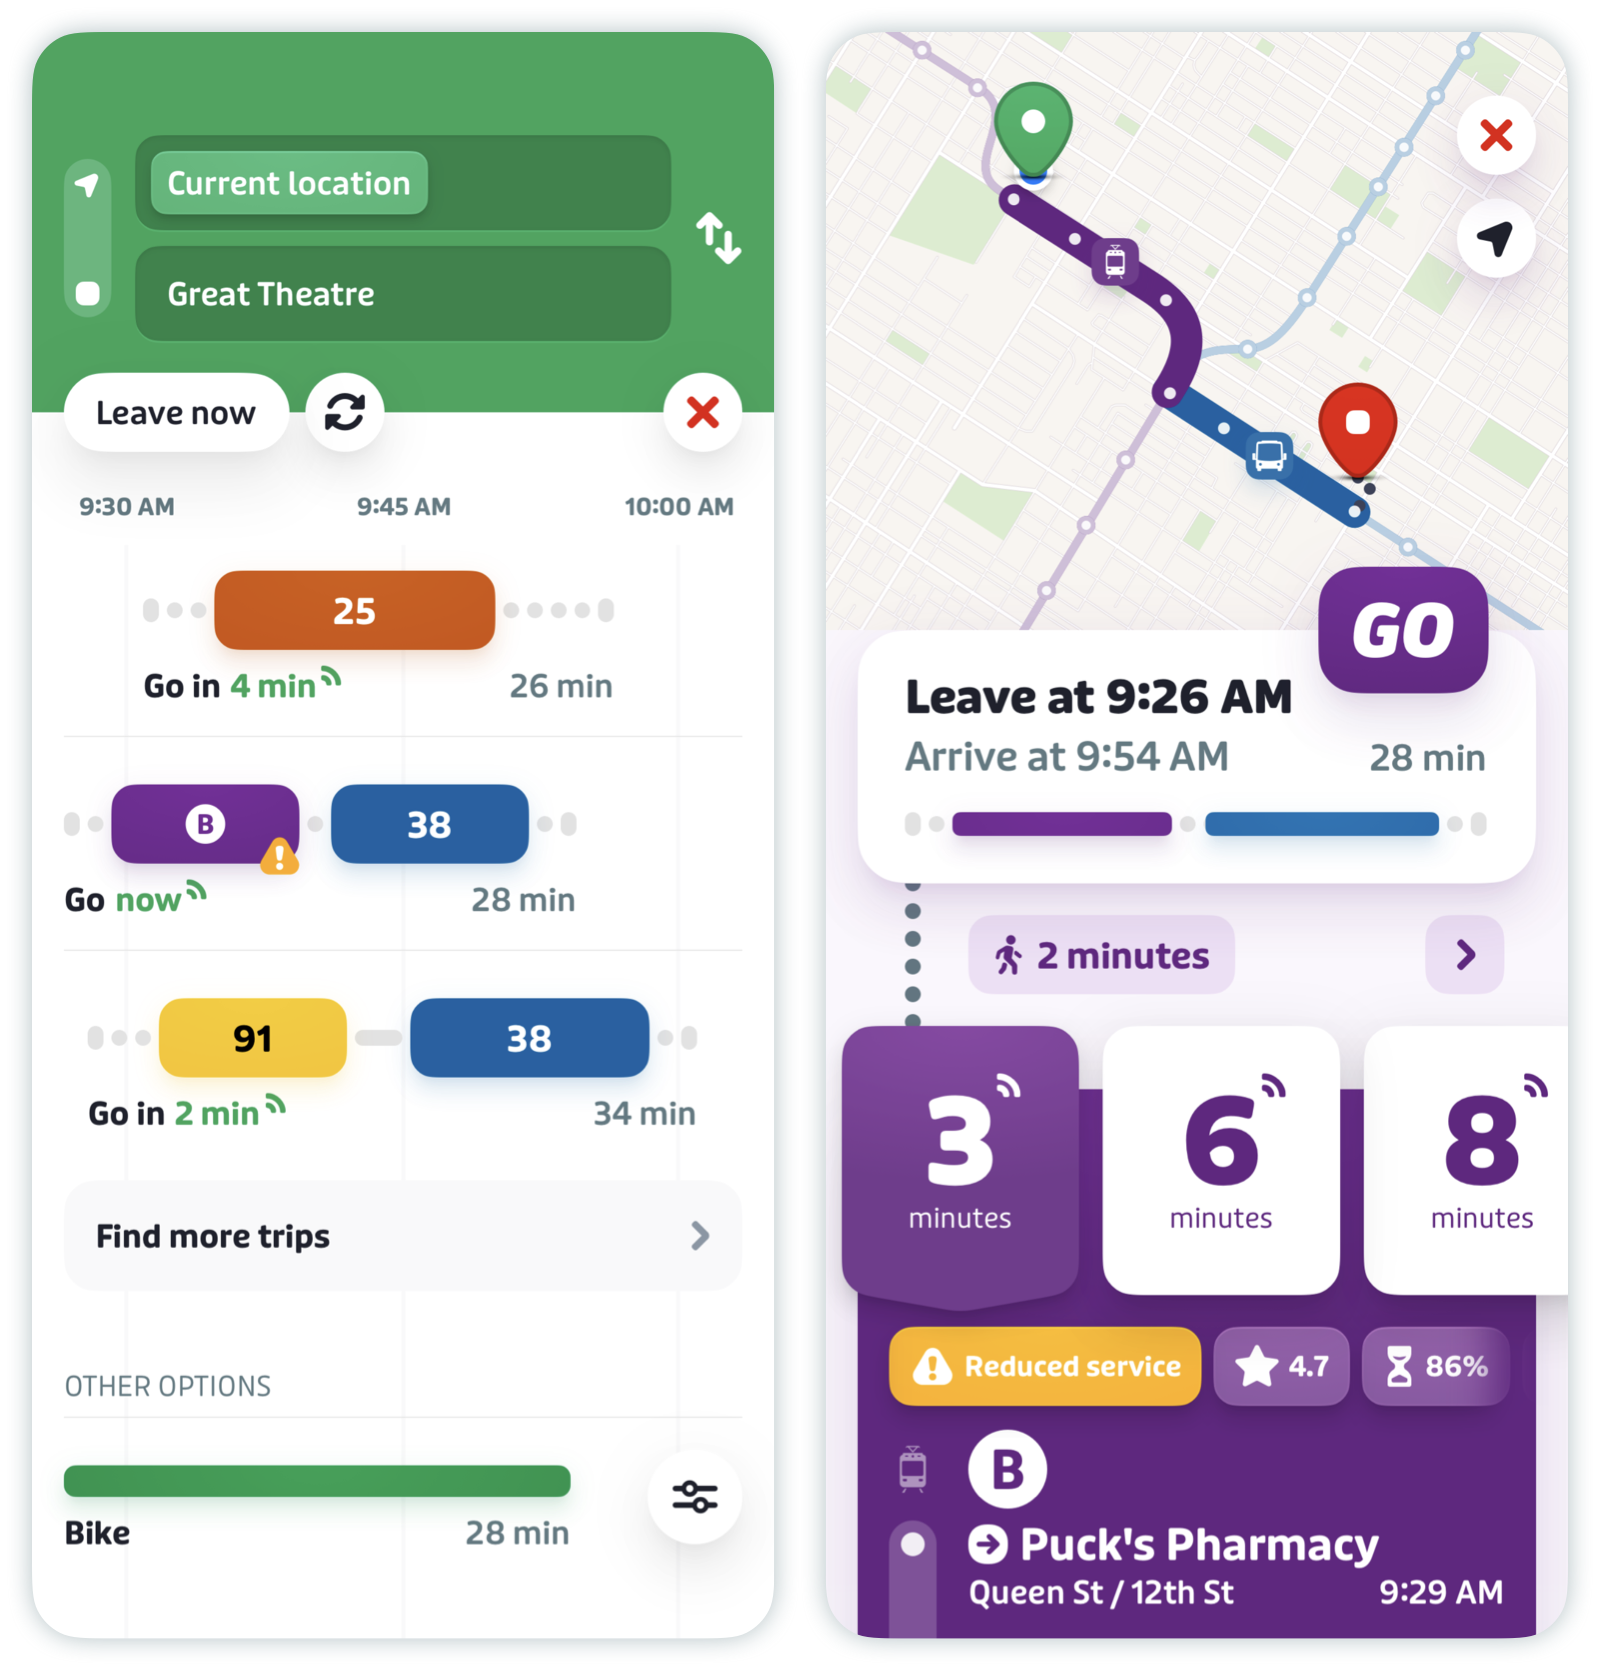
Routes affected by warning and info alerts are shown in the trip planner with a small ⚠️ icon. Warning and info alerts both display an orange warning icon on the corresponding leg of the trip. Riders can see more information about the alert once they tap on the trip plan result.
Transit Webinar: When and how to use service alerts
In this webinar, we’re digging through the rider comms toolkit and sharing everything you wanted to know about service alerts. Click here to watch the full video.